How To Create A Bootable Windows XP SP3 CD Using
CDburnerxp
CDburnerxp is a free application to burn CDs
and DVDs, including BLU-RAY and HD-DVDs. If you don't have it you can
download and install it by clicking
here.
Download Windows XP Service Pack 3 network
package installation from
Microsoft. Save the file directly in your C drive (it will make life
easier later on).
Open up "My Computer" and then open up the C
drive, find the file named WindowsXP-KB936929-SP3-x86-ENU.exe and rename it
to sp3.exe.
In your C drive create 3 folders named SP3,
XP and Boot.
Copy the entire Windows XP CD contents into
the folder named XP.
Now click the Start button and click on
"Run...". Inside the Run Dialog box type the following command:
c:\sp3.exe -U -X:C:\SP3

Click OK and the following box should appear:
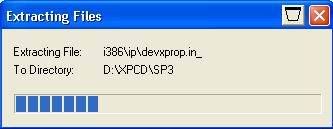
(do not pay attention to where it says "to Directory: D\XPCD\SP3"
because I created mine on my D drive inside a folder named XPCD. Yours
will say "to Directory: C:\SP3")
This box will disappear from the screen when it finishes extracting.
Click on the Start button and then click on
the "Run..." command again. In the Run Dialog box type this command:
C:\SP3\i386\update\update.exe -s:C:\XP
Click OK and the following box should appear:

When the integration of files is finished, this box should appear:
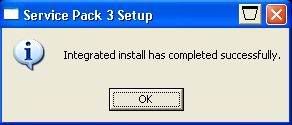
Just click OK.
The XP folder contains Windows XP SP3 and now we can create a bootable
CD.
Download
xpboot.zip and extract
it into your Boot folder. Once extracted, the name of the file inside
your Boot folder should be xpboot.bin.
Start CDburnerxp and choose create Data CD/DVD
Click on the "Disc" menu and then click on
"Boot Options..." and you should get the following dialog box:
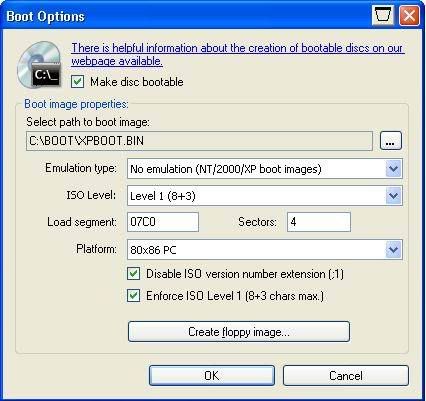
A: Check the box "Make disc bootable"
B: Where it says "Select path to boot image:" click the box with the 3 dots
on the right side and browse to C:\Boot\ and select the xpboot.bin file
(when you get the file browser make sure you choose "All files" from the
drop down menu where it says Files of type on the bottom otherwise you won't
see xpboot.bin in there).
The Path should be exactly the way it is in the picture above.
C: "Emulation type:" choose from the drop down menu "No emulation
(NT/2000/XP boot images)"
D: "ISO Level:" choose from the drop down menu "Level 1 (8+3)"
E: "Load segment" should be 07C0
F: "Sectors" should be 4
G: "Platform" just leave it at 80x86 PC
H: Check both boxes on the bottom "Disable ISO version number extension
[;1]" and "Enforce ISO Level 1 [8+3 chars max.]"
Click OK and if you get the following box just click Yes.

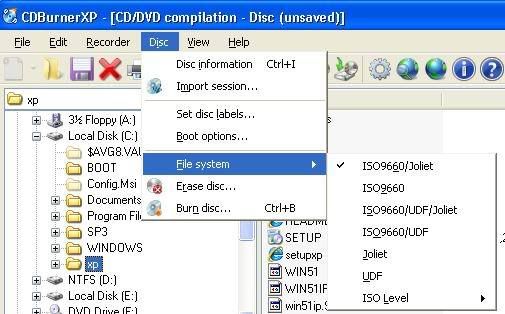
If you don't get the above dialog box just click on the "Disc" menu
then "File System" and make sure there's a check mark on "ISO9660/Joliet",
just like the figure below.
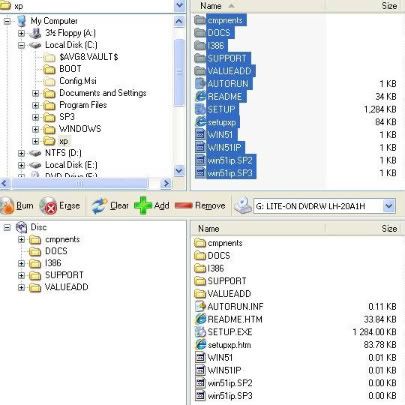
On upper left pane of the cdburnerxp expand
the c drive by clicking on the + sign and select the XP folder.
Now you should see all the files and folders that are inside the XP folder
on the upper right side pane. Select all the folders and files and
drag them inside the lower right side pane, these are the files that you are
going to burn to create the Windowx XP SP3 bootable CD. It should look
like this:
Now click on "Disc" menu again and choose "Set
disc labels..." and you should get the following dialog box:
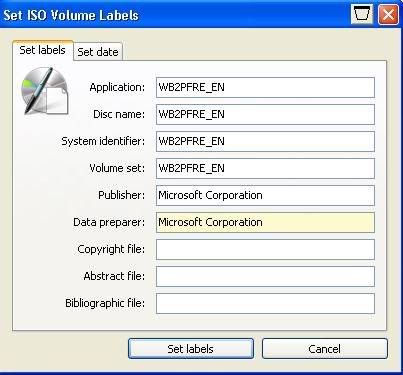
on the first 4 fields just type in "WB2PFRE_EN" and on the next 2 fields just
type "Microsoft Corporation" just like in the picture above. When
you're done just click on the "Set labels" button.
Right between the upper and lower panes to
the left side you will see the burn button, click on it and you should
get this box:
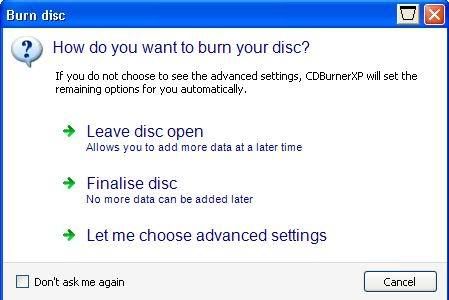
Click on "Finalise disc"
- Let it burn and soon you'll have a Windows XP
SP3.


No comments:
Post a Comment